Tuesday, December 24, 2013

2 Christmas layouts with Basic Grey for Scrapbook USA Expo

Hi all! I'm back with a couple more Christmas layouts- this time using some beautiful Basic Grey product. I was sent a paper pack of their 25th and Pine collection. This collection includes a TON of pretty papers as well as an embellishment sticker sheet and an alpha sticker sheet. The thing I love the most about Basic Grey product is the fun and unique patterns and the how well they coordinate together. I always find it inspiring to find different ways to incorporate as many of them as I can into my projects. This collection is no exception. Here is the first layout:
This is the Christmas photo we're using this year. Our baby is due January 12th, but he could be here any day really! I have asked him not to come on or before Christmas, but anytime after that is all good! Hence, the "Do Not Open Before Christmas" tag. Because this photo had some darker colors, I liked that the paper patterns had some darker colors in it as well.
The "special delivery" tag couldn't be more perfect, right? It even says "Do Not Open Before Dec. 25"! I love it. Both this and the gold tree tag were cut out from a page with lots of different tags and journaling blocks.
The upper sticker said 'Christmas Greetings'. I only wanted the 'Christmas' part so I covered with another sticker and layered the second part of my title over the rest. The 'bliss' font is the sticker alphabet that came with the pack.
There were several cute, coordinating border stickers as well as some fun shape and journaling stickers. Because the background pattern is so bold, I decided to keep the rest of the layout more simple so there wasn't too much distraction on the page.

Here is my second layout:

The color palette is a little subdued and almost vintage-y looking. I cut out some snowflake-like shapes from my Cricut and used the insides as well, showing the reverse paper patterns. Always looking for ways to incorporate more paper onto my layout!
I used some border strips here- I love incorporating these in my layouts and Basic Grey's are very unique! This ticket was cut from a page of cute tags, tickets, journaling tags and other cute images.
This cluster includes another tag cut from a page, as well as some of the cute stickers.
I found some coordinating thickers and used them for my title.
Again I had enough paper and embellishments left over to at least do another layout or two as well as several cards! Lots of fun, cuteness to work with! Thanks for looking!
Thursday, December 12, 2013

Christmas Tree Decoration with DCWV

Hi all! I have a fun (and easy!) home decor project to share with you using unfinished wood shapes, acrylic paint and DCWV paper! DCWV has some really cute holiday stacks this year and the nice thing about this project is you can customize it to suit your taste and decor (traditional, whimsical, vintage, etc.).
To start with I got some unfinished wood Christmas tree shapes with dowels on blocks. Here in Utah we have a local store that sells these fun shapes, but I know that a lot of craft supply stores sell things like these now.  They look a little something like this when you're first starting out:
Next you're going to choose your paper. I chose some papers from the Jolly Whimsy stack. I like the whimsical look for these trees, but as I mentioned earlier, there are several stacks to suit your personal taste!
Once you have your papers chosen you're going to mark the FRONT of your tree and flip it so it is facing the BACK of the patterned paper you chose. Then you're going to trace the outline of the wood piece on your paper and cut it out. Don't worry if it isn't perfect or if you couldn't get to some of the really tight nooks and crannies. You can always trim it up after it's adhered to the block with a razor or sand paper.
Next you're going to choose your acrylic craft paint color and paint it up! I color the entire back and most of the front where the paper is going to go, but you can paint just the part that is going to show if you wanted to save time (and paint!)
Once this is dried you are going to adhere the paper onto the front of your shapes. You can use Mod Podge for this, but I was once recommended to just paint on wood glue and that has always worked great for me. I just paint on the glue the same way I would the acrylic paint and then carefully place the paper. The glue takes a few minutes to dry so if you need to reposition the paper it's not a problem. I use a squeegee type of tool to make sure there aren't any air bubbles and then lay it paper side down to let the glue set so it doesn't pucker.
While that is drying I paint my bases and dowels. I found some fun glitter paint that I used on the bases. I drop a little wood glue in the hole on the base and then place my dowel to help secure it. I do the same thing when securing the tree to the dowel.
Now all you have to do is add some embellishment. The possibilities are endless- ribbon, craft wire, glitter glue, etc. Whatever suits your fancy! I used some tinsel ribbon on mine.
I hope you enjoyed the project- thanks for checking it out today!

Monday, December 2, 2013

2 Christmas Layouts with Echo Park for Scrapbook USA Expo

Hi friends! It's that time of year again! Time to start making Christmas crafts and projects! I love how I am always so much more motivated to do projects during this time of year- gives me a chance to catch up! So I was privileged to receive some wonderful product from Echo Park. I was sent the Tis the Season paper pack. This pack has some very nice traditional elements as well as some fun, modern trends (like chalkboard!). I have included 2 full layouts that I created with the pack, but easily could finish a couple more as well as some cards! There is a LOT to work with including 2 sticker sheets and some journaling tag/card pages. There is one page that has numbers 1-25 in different fonts which would make an adorable advent calendar project. Here is my first layout:
With this layout you can see a little bit of that fun chalkboard element that is so trendy right now. The rest of the colors and patterns really complement each other very nicely.
I created a little cluster with fun stickers in the upper right of the page, and added some border stickers in the corner.
I thought this chalkboard style card was so cute I decided to use it as my title. I love when products can do double duty- really makes my layouts come together quickly.
Here is the second layout:
I cut the music style piece on my Cricut. I love that it was done in the chalkboard style as well.
I created the title using one of the cute journaling cards, and the letter stickers from the pack.
The little banner was also fussy cut from one of the pages and popped up on foam dots for dimension.

I hope you enjoyed my projects, and be sure to pick up Tis the Season for your holiday projects- so much versatility and inspiration in this pack!

Saturday, November 30, 2013

Winter Subway Art box decoration

I thought I would share some of the other crafts that I have been doing lately (besides layouts! Yes, I do occasionally do something different! ha!) There's an awesome store here in Utah called The Wood Connection. They sell unfinished wood craft projects which you can then paint and decorate however you like. They recently started doing out-of-state delivery, so you should definitely check them out! This project was SUPER easy. All I needed was a 12x12 wood shadow box, a subway art style scrapbook paper, acrylic paint, brush, wood glue (or Mod Podge) and ribbon.
It was really this simple: I painted the edges with the acrylic paint and a foam brush. I then painted some wood glue onto the front and carefully adhered the scrapbook paper. Some people use Mod Podge for this, but the gals in the store said they use wood glue, so that is what I have used and it has always worked out great. I figured- if it ain't broke, why fix it, right? I then adhered some ribbon around the outside edge using the red super tacky tape. I topped it all off with a big bow and a cute fabric button that I adhered with a craft dot. Easy peasy!!


Subway art is so popular right now, and I thought this was such an easy method to make a cute home decor item using it! Hope you enjoyed it!

Tuesday, November 26, 2013

Baby Shower Crafts


So I had my baby shower a few weeks ago, and wanted to share some of the fun crafts and decorations. This isn't my usual layout or card post, but it is still craft-related, so I thought it would be fun to share.

 Here is an overview of the food table. I added some of our maternity photos and my sister made a cute diaper cake. Here are some better shots of the diaper cake:


Sorry for the slightly blurry picture...

 I made this banner using onesies cut from the New Arrival Cartridge, and font from Cuttin' Up. The paper is all DCWV- they have some adorable baby boy stacks.
I love how the backdrop turned out. I got the idea from Pinterest- just streamers and balloons, so pretty inexpensive!
My boyfriend's mom is an amazing quilter (quilt artist?) and she made this adorably awesome quilt. Isn't it the cutest?


 And one last little pic of yours truly... one happy little momma!


Sunday, November 24, 2013

20 Weeks

So just FYI, as of today I am currently 33 weeks (woot woot!), so obviously I am a little behind on my scrapbooking. Trying to balance full time work, 2 design teams and pregnancy means certain things get pushed to the back burner! BUT... I do want to try and keep up a little on my pregnancy pages so I will be able to focus on BABY pages when my little guy finally gets here! So here is my latest page- I am trying to take a belly picture every 2 weeks to track my growth. Here is a layout of my 20 week shot:
 I used some fun Echo Park product for this layout. It's a few seasons old, but since it is just for me, and not for design team work I figured that was okay :) Plus you gotta use up that old product sometime, right!! I decided to also kind of mark the seasons and holidays of my pregnancy so I wanted something a little more light and summer feeling as this was last August.
This was one of those layouts where I was able to pull it together using everything that came with the paper pack- papers, stickers- so it came together very quickly. I LOVE the cute cloud stickers! I did use my Cricut to cut out that gear-style circle in the background (Elegant Edges).
I added a bit of journaling as well, even though there was journaling on the photo. I just wanted to talk a little about how I was feeling at the time. This pregnancy has been so great, and such a blessing, and I wanted my little one to look back at these pages and see how happy I was during this time. The journaling says "20 Weeks! I am now 5 months pregnant, and so happy to be nestled safely in the middle of the second trimester. I love my cute baby bump, and am feeling great!"

Here are a few of my more recent baby bump shots:


Friday, November 15, 2013

I Pick you card for Scrapbook USA Expo

Hello! I am back with a fun card I created using the beautiful DCWV Spiced Cider Stack. This stack is perfect for all kinds of Thanksgiving themed projects. The paper has a beautiful glossy texture and some fun cooking related images. Here is my card:


This card actually came together very quickly, and I love how it turned out. I started with a red leaf patterned background, and added a yellow polka dot patterned paper as a layer. It doesn't come through very well in the photo, but the yellow dots have a little bit of a glitter-y sheen. I added some pretty yellow ribbon along the bottom. I then cut out the tag, fence-style sign and the leaf. I added some baker's twine to the hole of the tag, offset the sign so it falls a little off the card and popped up the leaf on foam dots for dimension. Here is a closer look of the leaf:

Thanks for looking at my project! Be sure and check out the DCWV Spiced Cider stack for your own Thanksgiving cards and projects.

Wednesday, November 13, 2013

So Thankful for you... for Scrapbook USA Expo

Hello my friends! I was asked to create a Thanksgiving themed project with some awesome product from DCWV.  I decided to do a slightly untraditional layout with the theme of thankfulness by paying tribute to someone in my life that I am very thankful for! DCWV has some amazing new product that is so fun to play with, and adds some beautiful texture and interest to your pages. One of which is the Fiber Natural stack and then the Burlap Paper stack. Both come in 6x6 pads, and the possibilities of how you can utilize them are endless! I especially loved playing with these textures for a fall-themed page. I love the texture it created on my page and how it really complemented the fall- themed paper.
 

Here is the layout I created using DCWV The Wild Splendor stack (Last year's fall themed stack):
I love the fall colors in non-traditional patterns. I have always liked ruler patterns, and of course chevron!
I adore these leaves. The glitter-y maple leaf was fussy cut from one of the papers in the stack, but the other leaf I made using the Fiber Naturals paper. I traced a leaf pattern and then used Distress ink. I used an ink dauber for part of it, then ran the leaf directly over the ink pad for the darker spots. The texture in the paper picked up the ink so well and gave it a very realistic looking color pattern. It was really fun to play with this and I love how it turned out.
Here is a close up of the burlap paper. It is basically like burlap fabric with a paper backing. There are so many fun things that you could do with this paper, and I absolutely love it for fall projects. I used it in this layout to just add a little extra texture and interest. I cut the title from my Cricut using the Thanksgiving cartridge, and then added some Thickers in a burlap color/pattern.
Lastly, I fussy-cut some chevron shapes from one of the papers in the pad and popped them up on foam dots for some dimension.
Thanks for looking at my project today, and be sure to check out the awesome new stacks from DCWV- I think you will have a blast finding creative uses for these textured papers!


Monday, September 30, 2013

Just Be Little for Scrapbook USA Expo

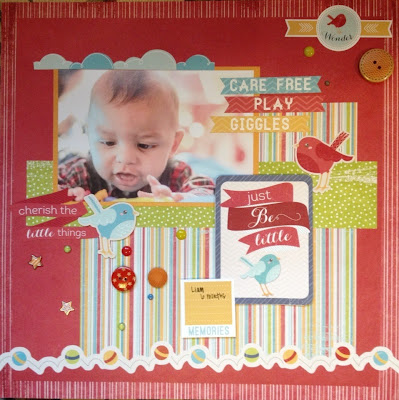
Hi all! I'm back again with another project for Scrapbook USA Expo! For this project I was able to make a fun layout using some absolutely adorable Imaginisce product. I simply adore this line, so fun for childhood layouts and I had the perfect photo of my daring nephew, Liam, to go with it!

Pulling this layout together was so easy thanks to all the cute coordinating stickers- and there were even some fun stamps to use!
I loved the sentiments in these banner stickers, they went with my photo so perfectly.
I like using coordinating journal cards to double for my titles sometimes. It makes pulling a layout together so much faster and easier, and sometimes the sentiment is just what I had in mind! I love this one: Just Be Little.
I also loved this banner sentiment- Cherish the Little Things. All of the product was so perfect for photos of children at play. I added some miscellaneous brads and buttons for a little added character and layout done! I hope you enjoy it!